Design time …

In order to get to doing anything with a bus that isn’t being a bus, you have to remove the seats.  And this is critical not just for floor-plan stuff, but for insurance and registration, unless you’re a commercial business and you don’t mind paying the rates for commercial insurance (Yikes!).  Now, you remember all those seats, right?

Oh, wait, that’s them …

Now, the seats are in with 5/16″ bolts of varying lengths through the floor and then 9/16″ bolts into the seat-rail along the edge of the wall, and, had one a team of people, and if the bolts weren’t very rusty, one could use a ratchet and/or a couple of wrenches and remove the bolts, and then the seats, and all would be wonderful.

But I live in the real world, and the bus was used by the Whitesboro High School (near Syracuse) and being that Syracuse was known as the ‘Salt City’ (due to the salt from the evaporation of shallow seas that covered the area in the Devonian), the bottom of the bus was covered in a light layer of salt, and the bolts were heavily corroded.

Here was the introduction of power-tools to the game.  First, I had a Makita impact hammer with a chisel blade that does wonderfully on concrete, but did basically nothing the the rusted-on bolts.  I had hoped to use it as the force is a shearing force, and would leave the flanges of the bus feet intact.  I ended up using a Makita 4″ angle grinder to take off the heads of the bolts.  A tip that I got from the Skoolie board stated that an easy way to deal with bolt heads was to cut down vertically through them and then horizontally slice to the cut.  It worked nicely, produced a whole lot of smoke, sparks, and burned rubber smell (more on that later), and the seats came out really nicely. When I had the seats all loose from the floor, I picked out three that were the ones I was planning on keeping for re-installation.

Once a bus has the seats out, it’s a big empty space.

This is really funky, it’s kinda like one big empty room, yeah!
  But it really is true, there is a lot of space.  And it gets loud with the echos.  But you can really see the blank canvas with all the seats removed.
No, really … It’s a lot of space … for a vehicle.

In fact, disregarding the wheelwells over the back, you can imagine it as basically a big rectangle 90″ wide, 26′ 8″ long (to the back of the driver’s chair), and just over 6′ high.  That’s around 200 square feet of floor space.  The wrinkles, of course are the wheelwells, roof hatches, and the exit doors.  Now, many people close up the side emergency doors (if their bus has one), but we wanted to keep ours, so we had to design around it.

There were some design constraints and advice that I gleaned from other Skoolie builds, things like you don’t really want to put your bathroom (and grey and black water tanks) behind the rear axle, due to the bouncing.  Propane tanks should go ahead of the rear axle, due to safety factors in collisions.  Re-using  the frames of the existing bus seats gives DOT rated safety harness points.  There was one seat we removed (just by the side emergency exit door) that had four feet, while all the others had two feet on one side, and were meant to attach the other side to the seat-rail.

So we ended up with these preliminary plans:

With a fold-out master bed and an added rear observation deck.
With a fixed master bed on the port side …
  Our designs went back and forth over those factors and our space, doorway, hatch, and undercarriage limitations and we ended up with this as our final plan:
The annotated final design. (New emergency exit window locations in red)
  This new design makes the shower a ‘walk-through’ to get to the side door, and doesn’t indicate the angling of upper areas of the walls (in green) to leave the roof hatches.  The two seats facing each other behind the driver are connected to the side chair rail, while the one that runs along the starboard wall is the one that had four feet.  It allows for a 24″ hallway from front to back and for full measure twin-bed bunks, rather than the extra slim/short RV bunks.
  Now, this isn’t perfect, but it set up the base of what we wanted.  It doesn’t show the locations of any of the water/propane/air tanks, and the fridge size is a bit smaller than what we actually got because of the extra tubing/heat vents on the back.  But it gives an idea of what we’re aiming for in the finished product.

First Things First

So, finally the bus arrived on September 19th of 2008.  The dealer we bought it from (Don Brown Bus Sales) not only delivered it for free, but also filled the tank before it left Herkimer to get to us.  They also replaced the starter since it wouldn’t get the bus going to make the trip.

The trip for the driver and the chase car was uneventful until they got to Buffalo and ended up on the West Side, down by the Peace Bridge.  Being that we were in the University Heights area, I had to talk them through the afternoon traffic and all the streets on the way over (which of course just built up my anticipation) until it arrived.

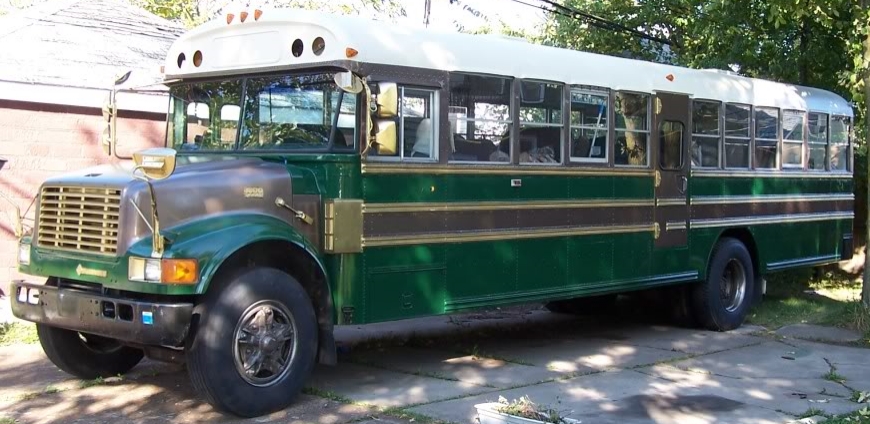
And here is #267 happily parked in our driveway.
 
The first view of the interior. (And the gearshift!)
 
And lots and lots of seats.  But look at the windows!

When you get a bus in New York State (at least) you have 14 days to make it not look like a School Bus.  Removing the flashing lights is relatively easy, but the swing-out sign is a bit harder.  Both leave holes in the steel ‘skin’ of the bus.  The next thing is, of course, the paint.

Now, I could have just done a very quick, single color paint job. But I didn’t.  We’d been talking about Steampunk stuff, and we had looked at lots of Pierce Arrows and Thomas Flyers (What, you don’t know about the Buffalo company that made the car that won the 1908 ‘Round The World’ race?), so we were going for something like this:

A prime example of a Thomas Flyer. Even in our color scheme.
  Now, if you’re painting a bus, you need to realize that there’s a whole LOT of outside. And that if you choose a really cool, dark color (like, oh, say … Black!) you’ll absolutely roast from the solar insulation.  So, in order to keep summertime temperatures down, we sent with Rustoleum Almond for the roof (it looks kind of like canvas), with the added benefit of HY-TECH Ceramic Insulating Paint Additive (as used by NASA!) to help cool things down in there.  And I have to admit, the ceramic ‘bubbles’ made a dramatic difference in lowering the interior temperature after I applied it.
  How do you paint the roof of a bus, you ask?  I used a roller with a long handle. And, of course, I wiped down as much of the exterior as I could with a big dust-mop that I soaked in mineral spirits to try and get rid of a lot of road grime.
And here’s rather flattering picture of the painting of the roof.

If you ever find yourself painting the rest of a bus, buy plenty of extra painter’s tape.  There are LOTS of things to mask off.  For instance, I went with painting the ‘rub rails’ brass, some between them and along the window rails a nice ‘Hammered Brown’, and the rest a nice ‘Hunter Green’.

And there are stages, and you have to keep it dry, all on a deadline …

Of course, that’s a lot of roller-time, and clean-up and fighting with the huge blue roof to keep the rain off.  But the end result came out well.

Pretty close to that Thomas Flyer, huh? (Don’t mind the holes, though.)

And that set up the basic paint for the outside.  I’d like to say that it still looks as good.  The Rustoleum has held up pretty well overall, but now, five years later, it definitely needs some touching up.  We’ll get to that in a later post when there’s warmer weather.

In The Beginning …

… we got a bus.

   Well, not just like it fell out of the sky.  A wonderful Steampunk craftsman, Jake Von Slatt documented how he built an RV out of a used school bus, my wife found it and showed it to me, and I thought, ‘hey, I could do that’.  I can do carpentry and plumbing and electrical and mechanical work, and I’ve always loved the idea of driving big vehicles (I drove my first bulldozer at five).
  So, I did what we always do when faced with a new project – we researched.  One of the best resources that I got was from the The School Bus Conversion Network where plenty of people owned school buses that had been retired from service and sold, becoming ‘Skoolies’.  I discovered that school buses are not all the same.  Different manufacturers have different building techniques.  Even within a manufacturer, there are many different options in terms of size and amenities.  And the bodies and engine/drive train/chassis are from different manufacturers as well.  It means that the bus that one person gets need not be much like what someone else gets, outside of the National School Bus Yellow and red and amber lights on the outside. This was 2008.
  By July of 2008, further research found a local dealer who had what looked to be a great bus, full size, front engine, used locally, with only 70,000 miles (with a diesel engine rated for a lifespan of 450,000-600,000 miles), but it got sold out from under our agent, and they weren’t going to have another like it for maybe another year.  We were a bit crestfallen, but kept looking.
  In August, we found a dealer in Herkimer, NY, who had a full size, front engine bus, with the same engine as the first (but 135,000 miles on it), but because it was from a different manufacturer, it had taller windows (which was another of the selling features on our getting a bus over factory-made RV, since we like to enjoy the scenery of travelling so much).
So official looking, but the high windows are evident.
  #267 had one more thing in it’s favor – it was a standard!
The gear shift is a plus, the dash left a little to be desired.
  Both my wife and I prefer standards, and they get better mileage and control than automatics.  And mileage can be a big deal.  Many modern factory-made RVs boast only 2-5 miles per gallon of diesel (and less for gasoline).  (As of our last trip in 2013, it’s looking like our bus gets 9-11 miles per gallon.)
  In October of 2008, #267 arrived and we started the conversion.  Due to many factors, not as much progress has been made, and this blog is going to be the place to document what will hopefully be the final ‘push’ to getting the whole project as close as can be to being finished.
  I’ll be documenting what I’m doing with the water system, the electrical system, the propane system, the air system (for horns/chimes, not air conditioning as of yet) and all the finishing work.  I’ll show the parts, give reviews and as much step-by-step as I can manage.  I’ll also go over what I’ve already done, and discuss a bit about travelling and camping by bus.
  Come along for the ride.